Sooner or later, we all have to deal with an injury. Whether it’s just an overuse issue, a simple sprain, or something more serious or chronic—dealing with an injury is a mental and physical struggle.
For Northern Hemisphere endurance athletes, now is the time of year when we have a little bit more time to heal, recover and gradually ease back into training. However, whether you’re dealing with an injury during the off-season or right smack in the middle of racing season, for the most part your course of action for how to heal and start training again is the same.
I spoke with Max Prokopy, a specialist at the UVA SPEED Clinic at the University of Virginia’s School of Medicine, to learn what advice he most often gives the many endurance athletes he works with about how to return to training after injury and how best to deal with a recurring one.
While first and foremost it’s important to make sure you’ve gone to see a doctor to rule out anything that might preclude you from resuming training, once you’ve done that and are on your way back to your baseline, here are five habits for making sure you stay that way:
1. Get a foam roller and use it often.
While foam rolling should not be used as a cureall for any training injury you encounter, it can be a good way to perform self-myofascial release over tight areas like hamstrings, glutes, hips, quads, calves and more.
Foam rolling, while sometimes not a pleasant experience, can help increase bloodflow, which will help your muscles recover faster in between workouts and can aid in preventing particularly tight muscles from causing a gait abnormality that is either contributing to or causing an injury.
A good example of this is a tight calf. Many runners, particularly those who run on their toes, experience a shortening and tightening of their calf muscles, which can lead not only to calf pain, but also to plantar fasciitis. By regularly rolling out your calf muscles after a run, you can help prevent this common overuse injury from occuring.
Try these four foam rolling exercises to get started.
2. Stretch your hip flexors every day.
Whether you are a triathlete, a cyclist, a runner or just an endurance athlete in general, chances are you spend the vast majority of your training hours in the saggital plane (moving forward) and likely bent forward to some degree. Stretching your hip flexors is a great antidote to all of your fun endurance activities, particularly those hours spent in the aero position on your bike or running.
Stretching your hip flexors regularly can help you prevent a host of problems, including knee pain, hip pain and even low back pain.
Luckily, stretching your hip flexors is simple and can be done anywhere—even while watching Game of Thrones! The “Couch Stretch” is a fantastic way to stretch out the front muscles of your body. To do it, start on all fours with your feet facing a wall or other flat, sturdy surface. Lift up one leg and drop your knee down as close to the wall as possible, while your other leg comes out into a kneeling lunge position (making sure your knee is over your ankle and in a comfortable position). The closer your knee is to the wall, the more intense the stretch will be.
Try doing this stretch once a day, starting with 30 seconds on each side and working up to several minutes on each side.
3. Practice diaphragmatic breathing.
So many athletes, particularly triathletes, unknowingly have their diaphragm go up while inhaling rather than down. This can lead to a host of physical pains, as well as an increase in stress levels.
Diaphragmatic breathing is commonly practiced during Yoga, but learning to adjust your breathing during activity can lead to performance gains simply by optimizing your body’s ability to take in oxygen and engage your core.
The best way to start learning diaphragmatic breathing is not while running! Start by lying down with your knees bent and one hand on your upper chest and the other just below your rib cage. As you breathe, feel your lungs expand (your belly will also extend). Try to keep the hand on your upper chest as still as possible.
You can also do this by standing in front of a mirror as your breathe and watching your diaphragm (which is located at the base of your lungs) go down as you inhale, and up as you exhale. Over time, you can also focus on learning to engage your core as you exhale, which is a powerful tool for keeping the powerhouse of your body engaged throughout the day.
This all might seem awkward at first, but once you practice it you can be more mindful of your breathing during running and cycling. It is also a great way to learn to control your heartrate, breathing rate and your overall stress response to harder efforts.
Get started with diaphragmatic breathing with these four yoga poses for endurance athletes.
4. Do these two glute exercises regularly.
Having strong, functional glutes is key to preventing a host of injuries and incorrect movement patterns. Many endurance athletes have quite overdeveloped quads, but quite tight and underdeveloped glutes and hamstrings—an imbalance that can lead to hip pain, IT Band Syndrome and more. Do the following two exercises as part of an overall regular strength training and functional movement routine:
Single Leg Squat
Placing one leg up on a bench or other roughly knee-level surface, your working leg will be out in front of you in a squat position (making sure your knee is over your ankle). Lower down into a single-let squat position, aiming to get your knee as close to the ground as possible. Do three sets per leg of 8-10 reps.You can start this exercise sans weight (it’s that hard!), but overtime add weight—either by holding dumbells or placing a barbell on your shoulders for increased load.
Single Leg Glute Bridge
Bridges are great exercises for firing your glutes before a workout and for general strengthening. Start by lying down on a mat with your knees bent, making sure your ankles are hip-width distance apart and are roughly six inches away from your bottom. Stretch one leg out in front of you (keeping it in line with your hips) and slowly lift your hips off the ground into a bridge position. Be careful not to use your low back to lift, but instead focus on the power coming from your glutes. Slowly lift and lower 8-10 times before switching legs. Repeat for three sets. As you are lifting and lowering make sure your hips remain level—you will quickly see that this is a fantastic way to quickly identify weaknesses from side to side!
Learn more exercises to add to your routine for functional strength here.
5. Undergo biomechanical testing.
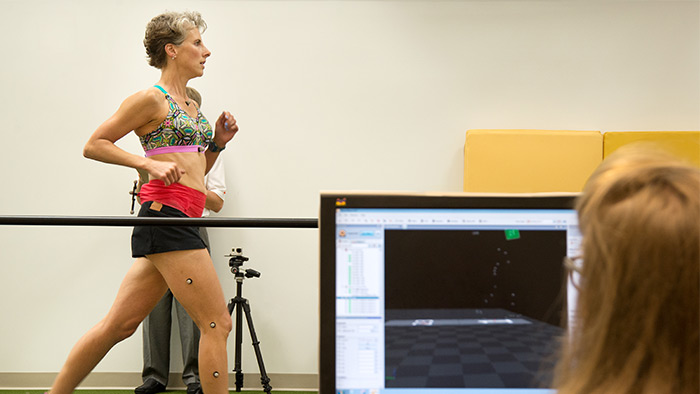
Facilities like the UVA SPEED Clinic are changing the way athletes address injuries and plan their training. Through technologies like Vicon Motion Capture Software, people like Prokopy can take everything front joint position and limb alignment to real-time gait analysis into consideration when creating custom-tailored strength and rehab regimens.
My friend Emily recently experienced this firsthand. She’d had hip pain for a year, seen two doctors, had x-rays and an MRI, even undergone two injections, but the most helpful intervention was a couple sessions with the physical therapist.This injury was incredibly frustrating to a woman who’s been active her whole life. She had her heart set on another IRONMAN next year, but she was hestitant to pull the trigger until her injury was sufficiently behind her. “How could I when no one had figured out the cause of this hip pain so I could fix it and go on?”
Athletes worldwide have been supported by clinics like the UVA SPEED Clinic, where the goal is to work with each athlete’s unique biomechanical footprint making them the most healthy and efficient athlete possible. It’s a resource that endurance athletes should keep in the back of their minds, even if they aren’t currently experiencing any injuries.
After measuring Emily’s join and limb alignment, they carefully placed 17 reflective markers on her limbs, pelvis, lumbar and thoracic spine. She was asked to run on a force-plate instrumented treadmill so they could capture her movement (inefficiencies and all) and use this, along with a detailed injury and training history, to help determine the best course of action.
By the end of the session, Prokopy had deduced that despite equal limb lengths and a level pelvis, when Emily puts load on her right leg, her knee internally rotates. This does not happen on the left side, which, combined with her paradoxical breathing, could be contributing to her hip pain.
After showing Emily the digital images and explaining the information they yielded from her treadmill analysis, Prokopy explains his diagnosis in detail and gives her several exercises to do to correct them. He coaches her through each one, making sure she can complete each one perfectly, before having her test out her new running form outside.
Finally, three more drills are taught as she runs through the vacant parking lot to put everything together. “I want to generate long lasting improvement in her movement,” he mentions. The funny thing was that she could already feel a change for the better. “It makes me run differently,” she says. Different is good.
Before she leaves, she’s given a detailed exercise plan, a DVD of her personal data, and exercises and stretches to review when she gets home.
Dealing with an injury of any magnitude can be a frustrating process, but by following the above habits you can be on your way to full training capacity in no time.


