Movement allows us to perform daily tasks and athletic activities ranging from the simple to complex. Your ability to move with an optimal range of motion can be altered by overuse, major and minor injuries, disease, or lack of activity. When this happens, muscles can become imbalanced by strength discrepancies or from being shortened or lengthened. Muscles can also become unresponsive to recruitment when another muscle has become overactive.
Over time, these imbalances may lead to changes in structural alignment, eventually allowing your body to be more vulnerable to injury. In many cases, an original injury can lead to subsequent injuries by an impairment of normal movement.
A movement assessment allows health and fitness professionals to observe imbalances of muscle strength, muscle recruitment, and joint range of motion. The results from a movement screen are used to determine corrective strength and flexibility exercises individual to your needs. It is possible to conduct your own movement screen with a keen eye, mirror, and possibly a second set of eyes from a friend or coach.
Use the exercises and steps below to determine your limitations. Each exercise can be used to determine corresponding corrective strength and flexibility exercises. This screen is used as a guide, not as a diagnosis or replacement for medical care. Follow the steps below and record your observations.
Lower Body Movement Screen
Single Leg Squat
During a single leg squat, the key kinetic chain checkpoints to watch are: feet and ankles, knees, and lumbo-pelvic-hip complex.
- Stand with your feet hip distance apart, hands on hips, and eyes focused on an object straight ahead. If you are doing the screen by yourself, stand directly in front of a mirror.
- Lift one leg and squat to a comfortable depth and return to the starting position for five repetitions.
- Record observations from the front view of how your knee tracks over the foot.
- Record observations from your shoulders and torso.
- Repeat screen on the other leg and record observations.
Compensations to look for:
- Does your knee move inward?
- Does your hip hike upwards or drop?
- Does your torso and shoulders rotate?
The most common compensation observed in a single leg squat is seeing the knee move inward with torso rotation. Your knee caving inward (valgus) can be a sign of overactive adductor complex (lack of groin flexibility) and underactive gluteus medius. Torso rotation, internal or external, can be a sign of a weakness in the internal and external obliques.
Sample Correction Exercises:
- Single leg squat. The same exercise used to screen for compensations can be used as a corrective exercise. Perform the single leg squat with bodyweight only, carefully attempting to maintain proper knee tracking and torso/shoulder alignment. 2 sets of 10 to 12 reps.
- Mini band resisted lateral walk. 2 sets of 15 to 20 steps each direction.
- Side step up to 12 or 18 inch box. 2 sets of 10 to 12 reps.
- Wide leg straddle stretch for groin flexibility. 2 sets of holding each stretch 60 seconds.
- Forearm side plank with rotation. 2 sets of 10 to 12 rotations.
Single Leg Pelvic Bridge Lifts
During the single leg pelvic bridge lift the key kinetic chain checkpoints are: ankles, knees, and pelvis.
- Lie on your back with your knees bent and ankles aligned directly under your knees. Ankles and knees should be hip width apart.
- Lift your hips off the floor by pressing evenly through your feet.
- Extend and straighten one leg off the floor with foot dorsiflexed and tops of the thighs parallel to each other.
- Lower and lift your hips for five repetitions while keeping one leg extended.
- Record observations from the tracking of the knee over the ankle.
- Record observations from the pelvis.
- Repeat screen on the other leg and record observations.
Compensations to look for:
- Does your knee cave inward?
- Does your knee splay wider than hip width?
- Does your pelvis dip on the side with the extended leg?
The single leg pelvic bridge lift will demonstrate transverse abdominal core strength, gluteus maximus recruitment, and hip extension mobility.
Sample exercises for correction:
- Cook hip lift. The Cook hip lift is used to strengthen the glutes and develop gluteus maximus recruitment while keeping pressure off the lower back. The form is similar to the single leg bridge except the non-working leg is bent with both arms wrapped around the knee hugging it into the chest. 2 sets of 10 to 12 lifts each leg.
- Forearm plank with knee lowering to tap the floor then lift using transverse abdominal muscles. 2 sets of 30 to 60 seconds.
- Kneeling hip flexor stretch. Come to a kneeling position with one knee on the floor or mat and the opposite foot flat on the floor with knee aligned over ankle and hands on hips. Begin by taking a deep inhale. As you exhale begin driving the hips forward and knee down while keeping the chest lifted. 2 sets of 30 to 60 seconds.
Overhead Squat
The overhead squat is a complex movement to screen. There are many variables that could be overwhelming to break down into individual elements, but the key kinetic chain points to view are: feet, ankles, knees, lumbo-pelvic-hip complex, and shoulders.
- Stand with your feet shoulder width apart and feet facing straight ahead. This exercise is best screened with your shoes off so your feet and ankles can be observed.
- Raise your arms overhead with elbows fully extended.
- Squat as if you are sitting back in a chair and return to the start position.
- Repeat for five repetitions and record observations.
Compensations to look for:
- Do your feet flatten?
- Do your knees move inward (valgus?)
- Do your knees move out (varus?)
- Do your arms fall forward?
- Is there an asymmetrical shift in weight?
The overhead squat has many variables to observe and determine corrective measures for. Seeing a flattening of the feet can be from tight calf muscles and a weakness of the anterior tibialis and gluteus medius and maximus. Knees that move inward may stem from a lack of flexibility through the groin and weakness of gluteus medius and anterior tibialis. Knees moving outward is a sign to look for an overactive piriformis, gluteus minimus, and tensor fasciae latae with a weakness or underactive adductor complex. A forward lean with arms falling forward may be signaling tightness through the calf muscles, hip flexors, abdominal muscles, latissimus dorsi and pectorals with a weakness of anterior tibialis, erector spinae, core stabilizers and the upper posterior chain. An asymmetrical shift in weight identifies much of the same observations as forward lean with the exception that the adductor complex may be tighter (overactive) on the same side as the shift with the opposite side of the shift displaying a weakness.
Sample exercises for correction:
- Self-myofascial release. Use a foam roller on the calf and latissimus dorsi muscles to help relieve tightness.
- Anterior tibialis exercise using a resistance band. While seated, stretch a therapy band or resistance band securely around your foot holding the band. Point and flex your foot with backward and forward motions, as well as side to side and rotations. 2 sets of 10 to 12 repetitions in each direction.
- Wall squat with overhead dumbbell press. Maintain proper knee and ankle alignment while engaging core and glutes. 2 sets holding static squat 30 to 60 seconds while continually repeating overhead press with light weight dumbbells.
- Superman lifts. 2 sets of 10 to 12 reps.
- Mini band resisted lateral walk. 2 sets of 15 to 20 steps each direction.
Upper Body Movement Screen
Push Up
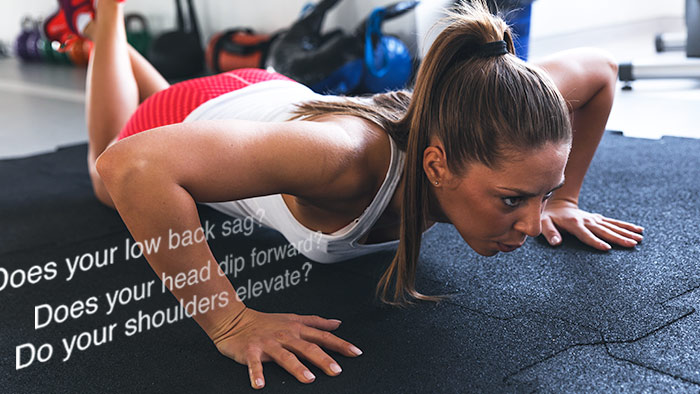
The push up can be performed in a traditional position or modified with the knees touching the floor. The key kinetic chain points to view are: lumbo-pelvic-hip complex, shoulders, and spine.
- Begin by lying on your stomach with wrists aligned under shoulders and toes tucked under.
- Push your body away from the floor as one unit until your arms straighten.
- Lower until your upper and lower arm form a 90 degree angle.
- Repeat for 10 repetitions and record observations especially upon fatigue.
Compensations to look for:
- Does your low back sag?
- Do your shoulders elevate or scapula wing by lifting away from the rib cage?
- Does your head dip forward?
Imbalances in your frontal and posterior chain will be observed during a push up. Common overactive muscles are: erector spinae, hip flexors, abdominal, pectorals, and upper trapezius. Underactive or weaker muscles observed are core stabilizers, gluteus maximus, lower trapezius, and cervical flexors.
Sample exercises for correction:
- Self-myofascial release. Use a foam roller on your back and hip flexors.
- Lying over the length of a foam roller with arms outstretched palms and thumbs up to release and lengthen through the pectorals and latissimus dorsi.
- Bear crawls to fatigue. The bear crawl activates the serratus anterior, core stabilizers, trapezius, and cervical flexors among many others in this full body exercise. Start on all fours then lift your knees off the ground with hips high and crawl in a forward motion. Try crawling in a backward motion and side to side for more muscle recruitment.
Wall Slides
Shoulder mobility is a common problem area for adults, especially over the age of forty, due to overuse injuries involving repetition. No two shoulders ever seem to be alike. So, pinpointing a single cause of reduced mobility may be futile unless it is to diagnose an injury. Any diagnosis should be left to a medical professional. An exercise like the wall slide can be used to screen mobility and as a rehabilitative exercise within itself.
- Stand with your back flat against a smooth wall without obstruction, arms outstretched to the side, bent to 90 degrees with fingertips pointed up to the ceiling.
- Slide your fingers up while extending the arms overhead then return to the starting position.
- Repeat five times and record observations.
Compensations to look for:
- Does your elbow move away from the wall as your arms extend?
- Can your arms fully extend overhead maintaining proper form?
- Do your hands maintain contact with the wall?
Limitations in shoulder strength and mobility are common and complex by nature. Corrective measures for the shoulder are considered both preventive and rehabilitative. Overactive pectorals can cause a drawing forward or rounding of the shoulders and decrease recruitment. Weakened stabilizer muscles of the shoulder, as well as your mid and lower trapezius, can leave your shoulder vulnerable to injury.
Sample exercises for correction:
- Wall slides. Using the best form to your current ability by activating through the back and shoulders. 2 sets of 10 to 12 repetitions
- Chest wall stretch at low, mid, and high arm positions. Hold each stretch for 30 to 60 seconds.
- Shoulder stability circuit. I, Y, T, W lying over a stability ball. 2 sets of 10 repetitions for each exercise.
Mobility Exercises Must Be A Regular Part Of Training
A mobility screen, whether performed by a professional or a self test, with corresponding corrective exercises and stretches, is a proactive approach to injury prevention. The more you know about how your body moves, the better equipped you are to develop and practice a regular injury prevention routine.
Use these motions as a starting point to identify areas that are over or underactive in your body. Develop a routine using some of the suggested exercises and stretches and follow that routine two to three times a week.


